Using motion sensors to turn your lights on and off is both comfortable and can help you save energy. This works best for areas in the home where you pass through, or rooms where you are not perfectly still for a longer period of time. We’ve got a small kitchen that is mostly used for preparing food. There is no table or chairs where we would sit still for a long time. So the kitchen is an ideal candidate for using a motion sensor to control the lights for us. Entrances and hallways are also perfect areas for motion sensors.
In this example I’m going to be using the Hue Motion Sensor, which comes with the added benefit of also including a temperature sensor and a light sensor. In the example below, I’m actually using the light sensor to check if there is sufficient natural light in the room, before turning on the lights. In this example we’re only automating the under-cabinet lights, but you could easily add other kitchen lights to the same shortcut.
UPDATE: As of the iOS 15 / tvOS 15 update, this shortcut will not work. There is a bug in iOS 15 / tvOS 15 which breaks the conditional if statements where we check for the brightness level of the room (lux). But there is a workaround the bug. You can read more about the workaround here.
UPDATE: It appears that the bug has been fixed with iOS 15.1 / tvOS 15.1 / HomePod Software Version 15.1.
In iOS 14, Apple fixed the default behavior for the turn off after x minutes function. It now behaves in the expected manner that every time the motion sensor senses motion, the delay to turn off is reset. This means that if you’re going to do a simple turn on and turn off automation, you no longer need to use a shortcut to do so. However, there are still many situations where you want to turn on lights using shortcuts triggered by motion sensors, and in these cases the solution below is still useful.

We need to create two automations: one to turn the lights on, and another to turn them off. The function to turn them off after a specific period of time does not work exactly as one might think. It will not turn off after a specific time from when it has stopped seeing motion, but rather after a specific time from when it first saw motion. This is why we need a second automation to turn them off.
The automation for turning the lights off is triggered by the absence of movement. It will then wait one and a half minute, checking every 3 seconds for motion, before finally turning off. If it detects motion, it will cancel the automation to turn off the lights.
Turning the lights on
We’ll start by opening either the Home or Shortcuts app. We then choose Automation (at the bottom) and press the plus sign (+) in the top right corner. Select Create Home Automation. Then select A Sensor Detects Something, and pick the sensor in the room we want to control the lights in. On the next screen select Detects Motion. The Time and People settings are optional. If you want different automations for times of day, you can select at what time this automation should work. For us, HomeKit knows if my wife or myself is at home, so we have the People setting set to When somebody is home. We then go to the next page. Now, if you’re using a motion sensor that doesn’t have a light sensor, at this point you can only choose the light and turn them on to whichever brightness level you want. If you’re using a Hue Motion Sensor, you should scroll down to Advanced and select Convert To Shortcut.
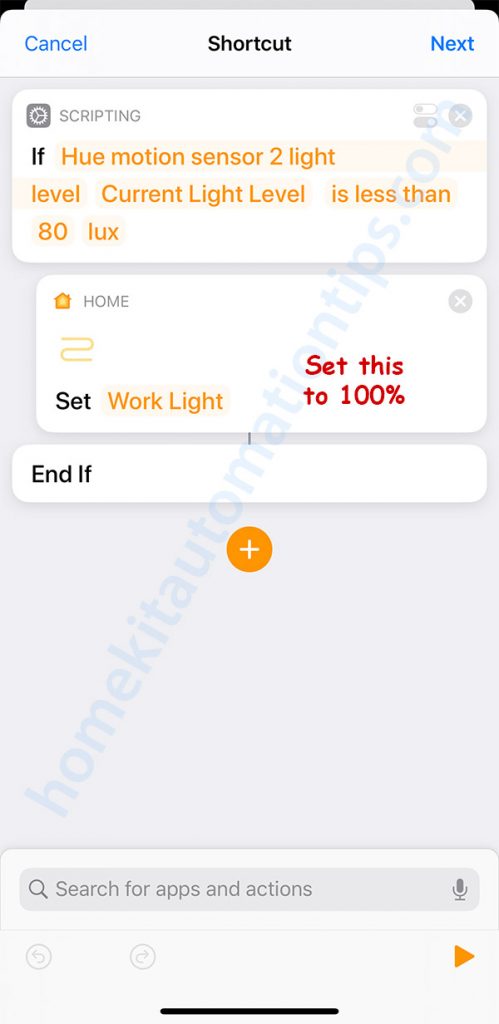
The shortcut for turning on the lights is very simple. We’ll start by adding an If statement. We’ll choose the light sensor as Input, Current Light Level as Name, and is less than as Condition. I’ve chosen 80 lux as the parameter for now, but I haven’t tested enough to know which would be the best value. We can remove Otherwise and add a Control Home action where we choose the light and the suitable brightness level and color. I’m using 100% brightness. The shortcut then ends with End If.
Turning the lights off
We’ll now start on the automation for turning off the lamps. We’ll start by creating a new Home Automation (just as we did for turning the light on). We then select A Sensor Detects Something, and choose the motion sensor that is in the same room as the lights. This time we pick Stops Detecting Motion, and again you may change the time for what time of day this automation is running. On the next page we scroll to the bottom and select Convert To Shortcut under Advanced.
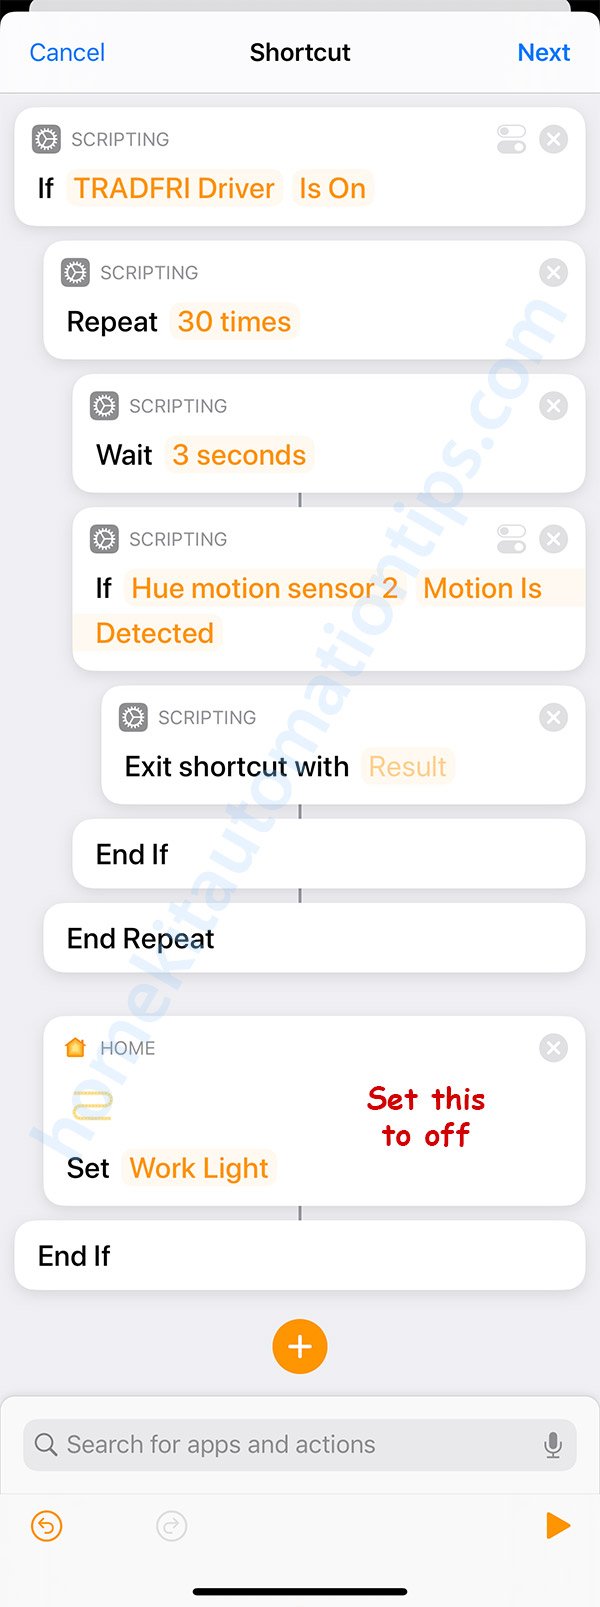
The shortcut starts with an If statement, where the lamp we turned on in the first automation now is the Input, and Is On is the condition. You can however only check if a specific light is on, while you can turn on a group of lights. This is why there’s a discrepancy in the names in the this example.
Otherwise can be removed, and we will add a Repeat action next. Choose 30 times. We’ll then add a Wait action, which we’ll set to 3 seconds. Another If statement is added, where we check in case the motion sensor has detected motion. If so, we’ll Exit shortcut with Result. (Update: Since iOS 15, Exit shortcut is now called Stopp running shortcut) You do not need to choose any result. Remove the Otherwise. End If and End Repeat follow. At this point we add the Control Home action to turn off the lights, and the last End If follows that.
In case you have to use more than one motion sensor to cover the whole room, you’ll need to create one automation per sensor for turning the lights on. You’ll also need to create one automation per motion sensor to turn them off. You have to change the shortcut to something like this:
If Light Is ON

Repeat 30 times

Wait 3 seconds

If Hue motion sensor 1 Motion Is Detected

Exit shortcut with Result

End If

If Hue motion sensor 2 Motion Is Detected

Exit shortcut with Result

End If

End Repeat

Set Light (OFF)

End If
This means that the shortcut will check each motion sensor for motion, and exit the shortcut if any of them detects motion.
You might have to experiment with how long the shortcut for turning the lights off should run, however, if the shortcut’s runtime is too long, the shortcut risks getting terminated.
If you’re looking for a slightly more advanced version of the “turn off lights” automation, where the lights will give you a warning by dimming a little bit before turning off, have a look at this post.
Hey, thanks for the article.
I `d like to ask. If I would like to light a lamp, not through the light intensity sensor, but using a motion sensor. So what will the first script look like?
In that case, you don’t even need to make it a shortcut. You can just add it as a simple automation for when a motion is detected by the sensor, and just add the lamp you want to turn on.
In the example in the article, the lamp would be turned on by the motion sensor. There was only a condition, that in case there is a lot of natural light in the room, the lamp would not turn on.
I would like to know if a shortcut can be used to get around the ridiculously short time (~15sec) that the hue motion sensor will turn off lights when an automation is set to turn off the lights when no motion is detected. It is pretty easy to be still for that length of time so it would be nice if a shortcut could be used to lengthen the time during which the lights would not turn off if no motion is detected. Any help appreciated!
Hi Rod! Yes the second shortcut does exactly that. It checks for motion for 1.5 minutes before turning off the lights, and you could modify it to run for even longer. The logic behind that shortcut is that it starts with a loop, that runs for 30 times as long as no motion is detected.
Each time the loop runs, it wait for 3 seconds, and then check if motion is detected. If motion is detected, it quits the shortcut without turning off the lights. If no motion is detected, it will run next iteration of the loop… again waiting 3 seconds and then checking for motion.
Only at the very end of the shortcut, which it only gets to if it hasn’t seen any motion for 1.5 minutes, it turns off the lights.
If you want to make it run longer, you can change the “Repeat 30 times” to 40, which will prolong the shortcut to run for 2 minutes (40 * 3 seconds = 120 seconds = 2 minutes). I hope this helped.
Hi Stefan,
Thanks for your help, but I still can get it to work. I set up the shortcut to turn the light on in my closet, which is controlled by a luton casita switch. This works fine. However, when I set up the shortcut when no motion is detected I followed your shortcut exactly, except that where you have “if TRADFRE Driver Is on” I put “If Main Light Is on” (which its the closet light). This apparently does not work, as the light does not turn off after 90 seconds of no motion. I am not sure that “If Main Light Is on” is correct here as I don’t understand what your Ikea “TRADFRE Driver” is and what the equivalent I would use in my situation, as I use Lutron caseta switches to control the lights. If I can get this to work it would be very useful to me for several lights as well as to many others that have had the same frustration with the hue sensor and the inability to set a time after no motion is sensed to turn off lights (it default to 10-15 seconds and can’t be changed). Thanks for any help!
Cheers,
Rod
The TRADFRI DRIVER is the driver that powers the under cabinet led lights, so it does sound like you’ve done everything correctly. I created a throwaway email address, so if you could take a screenshot off your shortcut and send it to home5413@homekitautomationtips.com, I’ll take a look at it.
If you don’t use a shortcut for the “when no motion is detected”, but set it to turn off the lights directly, does that work? I’ll get back to you after you’ve sent me the screenshot of the shortcut 😉
The first sentence in my comment should be “Thanks for your help, but I still can’t get it to work”.
Hi Stefan,
I got it to work. For some reason the shortcut stuck an “otherwise” in there that I missed. once that was deleted it worked great. You should go onto Reddit and the Apple support and let people know about this nice workaround to the Hue no motion detected. There are many people that are upset that they can’t get around this short delay time for the Hue motion sensor. Your approach works spectacularly! I will certainly refer anyone back to your site if I come across others having this problem.
Cheers,
Rod
Great! And thanks for your input! I’m happy for any traffic i can get to the site. I’ll also try to get around and create a few new posts about other useful shortcuts.
Hi Stefan,
I just ran into a problem that does not make any sense. I set this same set of shortcuts for a laundry room light and a closet light and each works exactly as expected. I have been trying to set it up for a pantry light, which is also controlled by a casita switch and hue sensor like the others but it will not switch off after the allotted when motion is no longer detected. I “Test this automation” and it turns off the light as expected, but it will not do this automatically. Have you run into this peculiarity?
I’ve had that problem a few times… But it has been fixed when I’ve power cycled the Hue bridge and Apple TV (my HomeKit Hub).
Well, it seems that this approach works sometimes, but if one enters and exits a room quickly the lights seem to fail to turn off. I am not quite sure why this is, but I suspect it has something to do with the 10-15 second window that the hue sensor has as default setting.
Do you have any settings for the Hue Motion Sensor in the Hue app, or is it only connected to the bridge so that it can be seen in HomeKit? I’ve have them set to “Not configured” in the Hue app.
None of them are configured in the hue app. It seems to be working now, as I had one wrong sensor in one of the shortcuts so that likely messed up two of the shortcuts. Right now I have three different sensors in 3 different rooms each running their own shortcuts and they seem to be working. Will let you know how things go after a few days of testing. Thanks for all the help!
Great! Glad that I could help!
After testing several hue and Onvis sensors your method works very well and consistently! I found that one thing can prevent it from workin: if you have another automation that uses another motion sensor to control one or more of the same lights the times those function cannot overlap. This might have been obvious to most, but I did not figure it out until I made this mistake. Thanks again!
This is great! Works fine, but there seems to be a maximum amount of wait time or repeats that Homekit can tolerate. The script doesn’t function will if I make it 15 minutes by increasing the reps, or the seconds of wait. Any ideas?
That is correct. It’s a limitation of HomeKit. The system will kill a shortcut if it takes too long to run. Earlier that limit was quite short (somewhere between 3-5 minutes), but should now be somewhere between 10 and 15 minutes.
Just tried this for 15 minutes. 300 timed every 3 seconds but it did not turn light off at the end?
You must have hit the time limitation, and the shortcut got killed. I haven’t actually tested what the exact limit is. The longest I’m running is 2 minutes, with some actions in the middle.
Thanks for your reply. I can’t believe how limited we are on surely the most basic and usef function of home automation by Apple. I keep reading things about EVE app and using that in the background but can’t figure it out. Have you used that? Also is it a limitation of the HUE sensors also as opposed to something like the eve sensors?
You are right in that there are some real limitations with what you are able to do to natively in HomeKit. As you say, it’s possible to use the EVE app to add some functionality, and this can be done for any HomeKit appliance, not just the EVE ones. I have an EVE Degree in the bedroom, and two of their smart plugs, but I haven’t done any automation in their app.
Comparing the EVE and Hue motion sensors, I haven’t used the EVE motion sensor myself, but from the specification I much prefer the Hue one. The Hue motion sensor is about half the size of the EVE one and comes with an additional temperature and lux sensor. Another limitation of the EVE system is that it is using Bluetooth for communication, which will not have the same range as Zigbee devices (Hue uses Zigbee).
As far that I know, there is no “smarts” on the devices. The functionality and logic happen in the apps or hubs.
If you want to go much more advanced, there are of course other solutions. You could run Home Assistant or Node Red on a Raspberry Pi and integrate it with HomeKit so that all the automations run on the Raspberry Pi, but you are still able to control appliances in the Home app or via Siri. Going this route will be a big time investment tough.
Thanks for replying again.
Another bug / mishap I think is the case unless I am doing things wrong…. Automations are great but sometimes things happen differently. IE I turn a light on via a hue switch for example or the app. However the turn off automation wont run, only when it was turned on from motion originally even though they are separate actions?
I’m glad if I can help or shed some light on how these things work.
About the bug / mishap. The error in your thinking (I thought like you before as well), is that the “No Motion Detected” used as a trigger for an automation only happens once after motion has been detected… meaning if the sensor hasn’t detected motion, it will not trigger “no motion detected”. In a way it makes sense, since otherwise it would be triggering all the time in an empty room, and the automation or shortcut would be running all the time.
However, if you’ve turned on the lights via Siri / the Home app on the phone / Hue Switch, and later walk in front of the sensor, it will turn the lights off after it doesn’t see any motion again. But, if you turn the lights on via the Hue Switch and then never walk in front of the sensor, the automation to turn them off will not trigger.
Without paying for PI, and added hardware, do you foresee any other way for my issue to be overcome.
Trying to mimic my ST setup of 15 minutes of no activity turns the light off. Your method sounded perfect but clearly the scripting times out from Apple at some point. I have had a smart home for so long and so keen convert.
Separate note, any talk of Apple adding the function of starting the count from when motion stops as opposed to when it starts?
If you’re able to use a slightly shorter time period, that would probably be the easiest way. I’m pretty sure it would work with 10-12 minutes.
And about when the count starts: Perhaps naming it “no motion detected” is at fault here. It should really be named “motion stopped”, as the sensor communicates when it has noticed that the motion has stopped. Meaning, if you enter a room with a motion sensor, the sensor will communicate that it has detected motion. As long as you are moving around, it will continue to relay the information that it sees motion. After you stopped moving around or exited the room, the sensor sends the message that it no longer detects motion, aka “no motion detected”.
Is there a way to do this without using a shortcut and just using the built in automations in the home app? The shortcut requires the device it was created on to be powered on and connected to the network. I want this to work when I’m not home or my phone is dead. I have several Apple TV’s and HomePods that act as home hubs. I tried following the directions from this post:
https://www.reddit.com/r/HomeKit/comments/8fqzhj/cancel_an_automation/
but I can’t get it to turn off the lights after no motion is detected for the life of me.
All the shortcuts I’ve posted so far are HomeKit Automation shortcuts, which means they run on your HomeKit Hub, not your phone. If you’ve got your Apple TVs and HomePods set up as hubs, the shortcut should run on whichever is the primary hub. You only use your iPhone (or iPad) to create the shortcuts, not to run them (unless your using an iPad as a hub). If you follow the directions in my post here, it will work.
Hey, that’s really nice and what I was looking for. I extended your version by splitting the off-timer into two parts, where I set the light to 50% after half of the time has elapsed.
This is amazing! Thank you. I was searching for a way to delay powering down lights after motion is no longer detected through the Apple Home App for some time. So glad I stumbled across your post. Curious why you wait 3 seconds and repeat 30 times instead of waiting 30 seconds and repeating 3 times (or some other combination)? Also curious if this will bog down the hub. How many home devices can be running a continuous loop shortcut before performance degradation is observed on the hub?
I’m scripting this to delay turning off the patio lights after motion is no longer detected but if i have someone out back while watching appletv will i start observing lag or unresponsiveness? Can multiple shortcuts run simultaneously? Can several lights be on a time delay shortcut at once? The way I understand the script is that it will wait 3 seconds and check for motion. Motion is detected it will exit the shortcut, but then since the light is on it will reenter the shortcut and begin waiting again. Will other shortcuts process while this one is waiting?
Thank you!
Thank you Micheal for your comment. I’m planning to post a new, slightly more advanced version soon where the lights at first dim a bit, giving you a warning before turning off.
As to the question about running the loop 30 times, waiting 3 seconds every time instead of running it 3 times and waiting for 30 seconds: 1) I’m not sure for how long detected motion is flagged, it might be for 5 seconds or so… meaning, if I would only check for motion every 30 seconds, it might be that the motion was detected 20 seconds ago, but it has gone back to no motion detected at the time you check. By checking every 3 seconds, the shortcut loop should always catch detected motion as it should be fresh. 2) By checking more often, the shortcut is actually running less time, since it will quit as soon it has seen motion. And the shortcut will not restart before no motion is detected.
These shortcuts are very light as far as computing goes. I’m running quite a few of them, several ones logging data to web-servers, and I’ve never noticed any lag or unresponsiveness in the AppleTV. And yes, the shortcuts should run independently, so several can run at once.
I hope you’ll check back for the more advanced version coming soon 😉
Hi Stefan,
Thanks so much for this! Works perfectly.
I wanted to check in about your slightly more advanced version where the lights at first dim a bit, giving you a warning before turning off. This sounds excellent. Might you be able to share that soon?
Thank you for the reminder 🙂 That post is now online https://homekitautomationtips.com/how-to-use-a-motion-sensor-to-turn-your-lights-off-with-homekit-but-giving-you-a-warning-first-more-advanced-version/
Hi Stefan,
As one of the earliest users of your automation I am happy to see so many now using it!. I wanted to respond to this particular question, as I have done that experiment. If the wait time is too long it does not work, at least for the Hue motif sensor (10 seconds for me did not work, whereas 3 seconds did). Hence, I stick with the 3 second wait time and adjust the number of repetitions. So far it works like a charm. It also works on ONVIS motion sensors.I have several Hue sensors running this automation (5-6) and I see no impact on the performance with all the other smart hot devices or the appletv performance when playing movies or TV.
Cheers,
Rod
Hi Rod,
Thanks for taking the time to give some feedback, and I’m happy it has been working for you.
Hello Stefan. I stumbled upon your blog while searching for this kind of solution for my Aqara motion sensor. I was very excited as it seems to me the best solution. The only problem, i cannot get it to work. So maybe you can help me setting it up. Aqara motion sensor triggers room light using simple homekit automation. I’ve set it to turn itself off after 2 minutes. I’ve set up second automation with shortcut exactly as you explained. This light still turns off only by timer that i set in the first automation. Aqara sensor can detect motion only once a minute. What combination of repeats and waits can work in my case and do i need to set “turn off after…” in first automation ( when sensor detects movement).
Thanks in advance for your help.
Hi Daniel,
For this to work, you shouldn’t actually set it to turn itself off on a timer at all. The shortcut should take care of that. I would start by only changing that. If you want to, you can always change how many times the loop repeats from 30 to 40. Let me know if it worked 🙂
Hi. Thanks for reply. The problem is that if i don’t set off timer, the light would never turn off. Means that the shortcut doesn’t work, although it looks exactly like yours. I don’t know why it doesn’t work.
Is it possible that the Aqara sensor doesn’t let you use “No Motion Detected” as a trigger? That is the trigger that is used for the second shortcut.
Update. Now it actually works. Disabled off timer and set repeat to 5. Perfect!!!
Thank you very much.
Great! Glad I could help. I’ll try to post some new shortcuts shortly 🙂
Thank you for this! How would I set the shortcut to only run at certain times of the day?
Hi Richard. I have to blog post about using time of day as a parameter (https://homekitautomationtips.com/how-to-use-time-of-day-as-a-parameter-when-writing-homekit-shortcuts-part-1/ and https://homekitautomationtips.com/how-to-use-time-of-day-as-a-parameter-when-writing-homekit-shortcuts-part-2/). The key is that you have to convert the current date into a number (an integer), and then use an if-statement to test that numer against the time you want to use as a condition. The rest of the shortcut should then be inside that if-statement, so that it only runs if that is true. Check out the two posts and let me know if you’re wondering about something else.
Thanks for that, I took a look at those posts – I got the time working I think but not sure I have the if statements in the correct order. Also, do I need an AND statement somehow, like ‘if time is between X and Y’ AND ‘if the light is on’?
I think the simplest way to do it is to make nested if-statements… So you start by checking if the light is on with an if-statement, you then put another if-statement inside that where you use the time conditional. That way, if the lamp is off, it doesn’t even need to check the time. I’ll do an example below:
If lamp is onDo the whole thing to get current time as a number (integer)
If current time is between X and Y
Repat 30 times
Wait 3 seconds
If motion detected
Exit shortcut
End if // motion conditional
End repeat
Set lights to off
End if // time conditional
End if // lamp on conditional
Thank you, I think that works! Will test over the next few days.
This is amazing. Thank you.
I couldn’t get it to work with two sensors though (shutting lights off). Could you please use your example above and add an extra light sensor? Adding an extra if didn’t work. Maybe I added it to the wrong place?
Hi Sarah, thank you for your comment.
I don’t have two motion sensors myself in the same room, but the code below should work.
And you only need to create the automation for when no motion is detected for one of the sensors.This “When No Motion Detected” automation has to be created for both sensors.If Light Is ON
Repeat 30 times
Wait 3 seconds
If Hue motion sensor 1 Motion Is Detected
Exit shortcut with Result
End If
If Hue motion sensor 2 Motion Is Detected
Exit shortcut with Result
End If
End Repeat
Set Light (OFF)
End If
So as you can see, the If-statement for the second sensor is inserted directly after the End If for the first sensor. Btw, I posted a slightly more advanced version where the lights go to lower brightness as a warning before turning them off completely.
I hope this fixed it. Let me know if it didn’t work.
Thank you for your reply! So that’s what I did but it seems as if it only works with the first sensor, the one that is the first one in the shortcut. Almost as if the second if-statement is ignored.
It works perfectly if I use only one sensör though.
Strange, right?
I’m guessing it didn’t turn off the lights at all?
We’ve got one motion sensor in the kitchen and one just outside the kitchen, so I tried doing this myself… and I noticed a flaw in my logic. The shortcut worked in the way that it didn’t turn the lights of when I was walking in front of either of the sensors… the problem was that the lights didn’t turn off when I stopped moving in front of either of them. My logic flaw was that the sensor only sends the message “No motion detected” once after it has stopped seeing motion.
The fix is that you have to create another automation for the second motion sensor (When No Motion Detected In…). Both shortcuts should look exactly the same, with if statements for both sensors. That worked perfectly for me. Let me know if this fixed it, and if it didn’t, does the lights turn off too early or not at all?
I’ll make an update in the text as well.
Did you get it working? 🙂
Great post, very useful. Now I know how to invoke the Hue Sensor out of the Home Automation. But excuse my ignorance.. what you have created is a SHORTCUT, not an AUTOMATION, so it will not check if your Lamp is on or not until you run the shortcut, right?
It’s a HomeKit shortcut being run on the HomeKit Hub (in my case the AppleTV). The running of the shortcut is automated by the sensor, so I’m not manually running the shortcut. Using shortcuts in combination with automation gives you much more options and ability to create more advanced logic.
OK thanks. I have an iPad as Homekit hub and this shortcut does not show up in the Home section but in the main page of shortcuts. I will look for a way to run it automatically
You’ll need to convert the automation action into a shortcut… If you read the whole paragraph starting “We’ll start by opening either the Home or Shortcuts app. We then choose Automation (at the bottom) and press the plus sign (+) in the top right corner…” That should get you started 😉
Yes I know, thanks, I click on the “Convert to shortcut” button at the bottom but the shortcut I get is not what you posted: I dont get the “Scripting “If Hue motion sensor 2 Motion is detected…” but instead “Home: Set SCENES and ACCESORIES”
The Home: Set Scenes and Accessories is for controlling HomeKit scenes and accessories, if you click Scenes and Accessories you can choose which scene or accessory you want to control. This is used in the example for setting the Worklight to 100%. To add the If statement, or other actions, you have to press the plus (+) sign in the circle, or use the “Search for apps and actions” at the bottom. You can then search for the specific apps or actions and drag them to the correct place. If you want to remove something, you just press the little white X in the gray circle.
Great, many thanks!! I dont know why I thought I could only add conditions in the Personal automations and not in the Home automations.. Do you think they will ever allow to include shortcuts within a home automation? I have shortcuts to control non-home devices
Well, you are able to use shortcuts in home automation (that’s what you use when you have the screen “Select scenes and accessories for this action” in the automation, and you scroll to the bottom of the screen and choose Convert To Shortcut under Advanced). So there are Personal shortcuts and Home shortcuts… but they differ quite a bit in abilities. I hope that Home shortcuts will become much more advanced in the future. For instance, you are able to save the state (brightness, color) of a HomeKit light into a variable, but you are not able to use that variable to set the state (brightness, color) to a light. There’s a lot useful things one could do with that capability.
Amazing guide. I have had my. House run on SMARTTHINGS successful for 6 years now. We do however have all Apple in terms of phones, iPads, mac and Apple TV. With Smartthings stock basically non existent worldwide, and now needing another sensor, I took the plunge having followed your guidance for a Hue Sensor.
Firstly its baffling to me that have to go through this complexity (appreciate not complex to some) for a basic turn off due to inactivity. The way it works as standard without your method is ridiculous. So thank you!!! I will be persevering with replacing my other 5 sensors, and 2 plugs so may need your help!
The one I’m looking at some of the other comments which I think touch on this is the stairs. We have a light in the downstairs hall with a sensor, and the same on the upstairs landing. We also have a 3rd sensor which is on the stairs so if the sensor goes off it will turn on both lights, although one will already be on due to the other sensors. This makes for a smooth transition when moving either upstairs or downstairs so there is no lag once reach the summit or the bottom.
Thank you Ellis. I’m planning on doing a guide for using two or more motion sensors for a larger room, a hallway, or as in your case a staircase. I do agree with you that this should be easier than it is.
Hi Stefan, I have a HomeKit Secure Camera also acting as my motion sensor in the same room as the light. I’ve followed your instructions but I can’t get my setup to work properly. The motion sensor triggers the light fine, and after no motion is detected the light switches off. Perfect… However, the camera’s motion sensor detects the light switching off as a motion – I guess because of the change in light, so then triggers to switch the light on again. It’s basically in a loop of switching on and off. I’ve tried adding Waits to the No Detection Trigger, but doesn’t seem to work. I’ve just ordered a normal standalone motion sensor to see if this fixes it, but have you any ideas?
Hi JP,
It seems like the camera’s algorithm for detecting motion works a little differently than the motion sensors’, and that the camera is more sensitive to the light changing (which makes sense). The normal standalone motion sensor you ordered should fix that problem.
Thanks for letting me know about this. When writing these posts, one can’t test everything, and it’s very valuable to hear about experiences when it doesn’t work the way it should.
By the way, when you get your motion sensor, you might want to check out this post: https://homekitautomationtips.com/how-to-use-a-motion-sensor-to-turn-your-lights-off-with-homekit-but-giving-you-a-warning-first-more-advanced-version/
It’s the same shortcut, but with some extras 🙂
Just to let you know, the dedicated motion sensor works a treat. I guess it’s not practical to have the security camera’s motion sensor controlling a light in the same room.
Great to hear! And thank you for coming back to let me/us know. It’s always good to get feedback when stuff has worked (or even more important, if they don’t work).
Hi there,
It looks like your suggestion to leave “Result” empty worked with iOS 13 only. I’m running iOS 14 and I couldn’t get this to work until I put something in the “Result” field.
Hi Alex,
That’s interesting. I’m running iOS 14.2 on my iPhone and tvOS 14.2 on the AppleTV 4K that operates as the HomeKit Hub. I just tried creating a new shortcut, where I exited a for loop early with a Exit shortcut with Result (which I didn’t add anything to) statement. It works without any problem.
Stefan,
I’m looking to add create a shortcut using 3 sensors for the stairs / front entrance and garage. Any help is appreciated. Having a big of difficulty keeping the lights to stay on.
Thank you,
Do you want them to work as a system, where if one of the sensors sees motion, the lights turn on in the stairs, front entrance and garage? I could make a post on how to make that work. The key is that you have to make more than one shortcut, and they have to be “interconnected”.
I’m looking for this:
Garage Sensor, turn on Garage Light + 4 Entrance Lights
Entrance Sensor, turn on 4 Entrance Lights + 6 Stair Lights
Stairs Sensor, turn on 6 Stair Lights
No motion either 3 sensors, turn off all 11 lights.
I’m also looking into homebridge for myQ garage HUB instead of buying the MyQ bridge (which has poor reviews).
I’m actually running HOOBS (a very user friendly HomeBrige version) on a Raspberry Pi 4… I’m mostly using it for dummy switches, that I use as different variables.
For what would probably work for your three motion sensors, I tried writing some quick pseudo code. If you have any questions, just let me know 🙂
Start by creating 3 Home Automation: A Sensor Detects Motion
1)
If Garage Sensor detects motion
Turn on Garage Light
Turn on 4 Entrance Lights
2)
If Entrance Sensor detects motion
Turn on 4 Entrance Lights
Turn on 6 Stair Lights
3)
If Stairs Sensor detects motion
Turn on 6 Stair Lights
Then create another 3 Home Automation: A Sensor Stops Detecting Motion
1)
Repeat 30 times
Wait 3 seconds
If Garage Sensor Motion Is Detected
Exit shortcut with Result
End If
If Entrance Sensor Motion Is Detected
Exit shortcut with Result
End If
If Stairs Sensor Motion Is Detected
Exit shortcut with Result
End If
End Repeat
Turn off Garage Light, 4 Entrance Lights, 6 Stair Lights
2)
Repeat 30 times
Wait 3 seconds
If Entrance Sensor Motion Is Detected
Exit shortcut with Result
End If
If Garage Sensor Motion Is Detected
Exit shortcut with Result
End If
If Stairs Sensor Motion Is Detected
Exit shortcut with Result
End If
End Repeat
Turn off Garage Light, 4 Entrance Lights, 6 Stair Lights
3)
Repeat 30 times
Wait 3 seconds
If Stairs Sensor Motion Is Detected
Exit shortcut with Result
End If
If Garage Sensor Motion Is Detected
Exit shortcut with Result
End If
If Entrance Sensor Motion Is Detected
Exit shortcut with Result
End If
End Repeat
Turn off Garage Light, 4 Entrance Lights, 6 Stair Lights
Why I set repeat 15 times wait 60 seconds that can’t to turn off the light
The shortcut only for the repeat 3 times wait 30 seconds to turn off light??
The other way around. Repeat 30 times, and wait 3 seconds. When the motion sensor detects motion, it’s only signaling a few seconds that is has detected motion. If the shortcut doesn’t read the status of the sensor while it’s signaling that it has detected motion, the shortcut will not know that the motion sensor has detected motion. There’s also a time limitation for how long a shortcut can run, before it is being terminated. I’m not sure exactly what the limitation is, but probably somewhere around 10 minutes. So if your shortcut runs for too long, it will be terminated before it turns off the lights.
thank for your answer
if i want to set more time to turn off the light, how i can creat the shortcut
You could try with 10 minutes, and see if that will work?
Repeat 200 times and wait 3 seconds. If you keep it the same otherwise, it should work. If you want to go longer than 10 minutes, you can try adding 20 times to the repeat (220) to add another minute, and see if that works reliably. If it does work, you can add another 20 times (240) and see if that works… every 20 repeats adds another minute… There is a time limit somewhere above 10 minutes, but I’m not sure where exactly it is. Keep the wait to 3 seconds. And please report back if you get it to work 🙂 I’m interested to hear how far you can push it.