Next, press Show More, Date Format and Custom. In Format String you’ll see the default custom Format String, a combination of upper- and lowercase letters. If you press the little Play button ( ) in the bottom right corner, the shortcut will run in the current configuration and output the current date in the default custom format. It’s a very long format with weekday, date and month, time, and time zone information. This is not what we want.
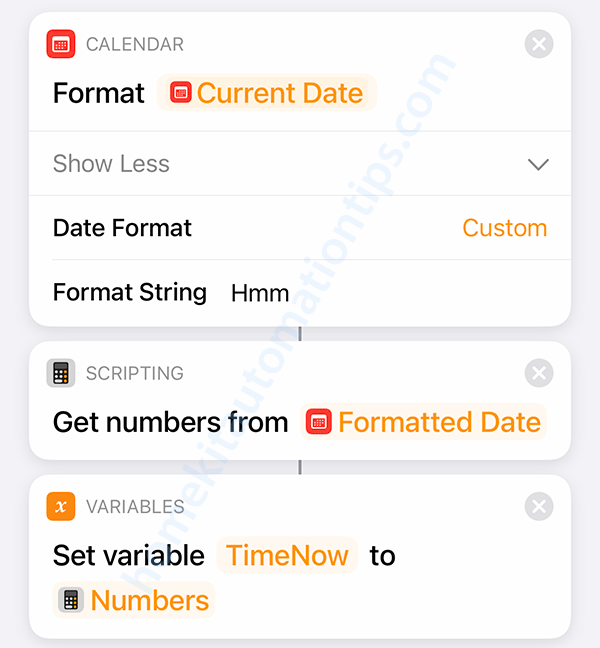
Press within the default custom string format and replace the default value with the letters Hmm. This is case sensitive, so it’s important that the first letter is an uppercase H. The letter m, repeated twice, must be lowercase. Use no spaces, or anything else.
The H stands for hours in the 24-Hour Clock with no leading zero, and m stands for minutes. We put the letter m twice, because we want to get the number of minutes with two digits, meaning if the time was 08:05 AM, we want the minutes to be represented by 05, not just a single 5. If you press the little play button in the bottom right corner at this point, it will output the time with 3 or 4 digits (depending on the hours).
At this point, the shortcut interprets the number you’ve just extracted as a text value (a string value if you do programming), a text value that contains numbers. But we want to be able to compare different numbers to each other, and that’s why we need to convert it into a number value (an integer if you do programming). To achieve this, we use the action Get Numbers from Input.
It will preselect the value from the action above, in this case Formatted Date, exactly as we want. If you press the play button at this time, you will notice that it has removed any leading zeroes. If the time was 12:05 AM, it will now give you the number 5 (in military time 0005), which is exactly the way we want it to be.
At this time, we will save the number into a variable with the Set Variable action. Again, it will have prepopulated the input with the Numbers from the previous action. Select Variable Name and give it a descriptive name like TimeNow.
Naming variables properly is something very important in both programming as well as when writing slightly longer shortcuts. Giving variables names like a, b, c, x, y might seem ok at first, but when you need to remember which name represents what data further down in the shortcut, it quickly becomes difficult to work with. The same goes for when you go back to edit a shortcut you created weeks or months ago, you have no way of remembering what nondescript variable names represent.
Thank you!! I have a much better idea now. Do you also know how to set from sunset – 2am and from 3am – sunrise?
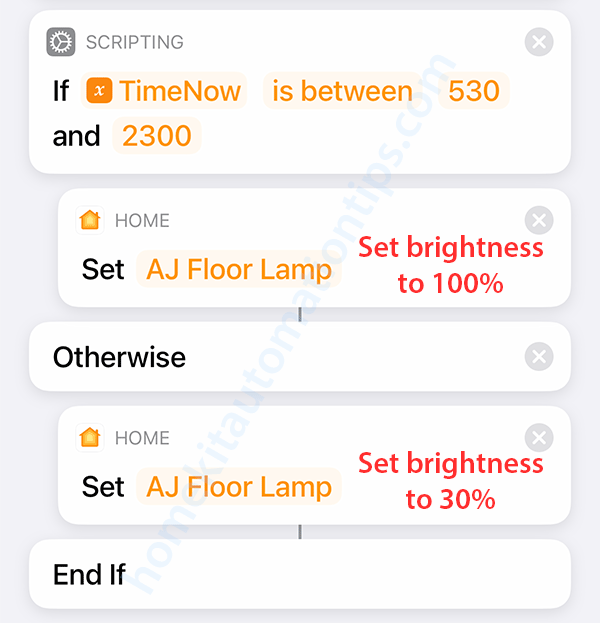
The simplest solution for doing anything going from a time before midnight to a time past midnight, is to make it the default, meaning if none of the other if-statements are true, you do the last thing. In that case you either need to do a nested if-statements with otherwise, or put an Exit shortcut with Result as the last part in each if-statement.
Otherwise, you have to create two if-statements for that part like this:
If TimeNow is between SunsetTime and 2359
Do action X
End If
If TimeNow is between 0 and 200
Do action X
End If
And then add a third if-statement for the other condition:
If TimeNow is between 300 and SunriseTime
Do action Y
End If
—
I’ll go into more detail about sunset and sunrise in part two (but you also got that in the answer I posted to your original question 🙂).
Thank you so much!! Yes, I’ve read your previous comment and, I’ve finally figured it out. Now I’m trying to follow your turn lights off when no motion is detected guide. Hope it’ll all work out fine.
Actually, I’m moving from Android to IOS and I’m in loving with Home Automation possibilities in IOS systems.
I’m using Homebridge to expand my possibilities and until now, I did’t know how to use timestamp.
Thanks for share this knowledge with us
Greetings from Brazil
Thank you Bruno for your comment. I’m glad this post was helpful 🙂
Wow I cannot believe I haven’t came across this site until now, a lot of YouTube videos but I prefer written content, So thank you for this. Will be bookmarking your site.
I’ll try using this with an NFC tag and lights.
Cheers.
Thanks Alex! I’m glad you like it 🙂
Hi there, thanks soooo much for explaining this in details. I really appreciate your sharing of knowledge. I was wondering how do we put it in Automation? OR will ios constantly checking if the shortcut is within the time frame before it runs? Again, Thanks soo much!!!
Hi Doris,
And thank you for your comment and question.
The shortcut must be triggered some other way, for instance:
a motion or contact sensor,
a accessory is controlled (a lamp is turned on or off)
people arrive or leave (if you are using geofencing)
If you are using Homebridge or Hoobs, you could also use a scheduled dummy switch that triggers the shortcut at an interval, for instance every hour or every five minutes.
The automation and HomeKit shortcut itself will run on your HomeKit Hub, which would be an AppleTV, HomePod (Mini) or even an iPad (least stable).
Hi Stefan,
I am not a HomeKit user but creating many other type of Siri Shortcuts to use in my car, iPad or iPhone, you know. There’s a crazy variety for these 🙂
I was always thinking (and I tried few times) to add some time limitation to these automations that would be amazing but I couldn’t manage it.
This morning, I searched it online and came across your page which I really think so successful and need to be more improved and developed because no doubt that there’s a light for this.
I really appreciate and thank you.
I guess there are plenty of things to learn from you about it.
Thank you Batuhan for your kind comment 🙂 I’m happy that you found it useful