There have been some questions in the comments about what the longest possible duration a HomeKit can run. For what purpose would you need to use a shortcut that takes many minutes you might ask. Well, especially if you’re using motion sensors (or other sensors) for turning things (most probably lights) on and off, you might want to keep a shortcut in limbo for a few minutes while it’s checking what’s going on before turning the lights off. For instance, if you use the “no motion detected” as a trigger to turn lights off, it’s nice to be able to keep the shortcut running for a few minutes, checking if there is new motion detected before turning the lights off.
I’ve done the testing using an AppleTV 4K as the HomeKit hub, and for me it seems like the time limit before the shortcut is being automatically terminated is exactly 10 minutes. However, learning from readers of this site, it seems like the HomeKit hub you’re using might be a factor. If you’re using an iPad (Pro) as the hub, the time limit seems to be quite a bit shorter. HomePod and HomePod Mini seems to be pretty much the same as the AppleTV 4K.
(In case you’re using an adblocker, please consider whitelisting this site. Any revenue from Google ads goes to the costs of running this site.)
If you want to test this for yourself, I’ve created a shortcut that you can run on your system using only something to trigger the shortcut and a lamp. If you do run this test shortcut, I would be grateful if you posted your result as a comment, letting me know what you’re using as a hub and what the maximal duration you were able to get.
The shortcut is very simple, and I’m using a Hue Dimmer Switch to trigger it. However, if you don’t have anything to trigger the shortcut, you can always just use one lamp and create a (temporary) HomeKit automation shortcut that runs when the lamp is turned on.
As before, I’ll go through the different steps of the shortcut.
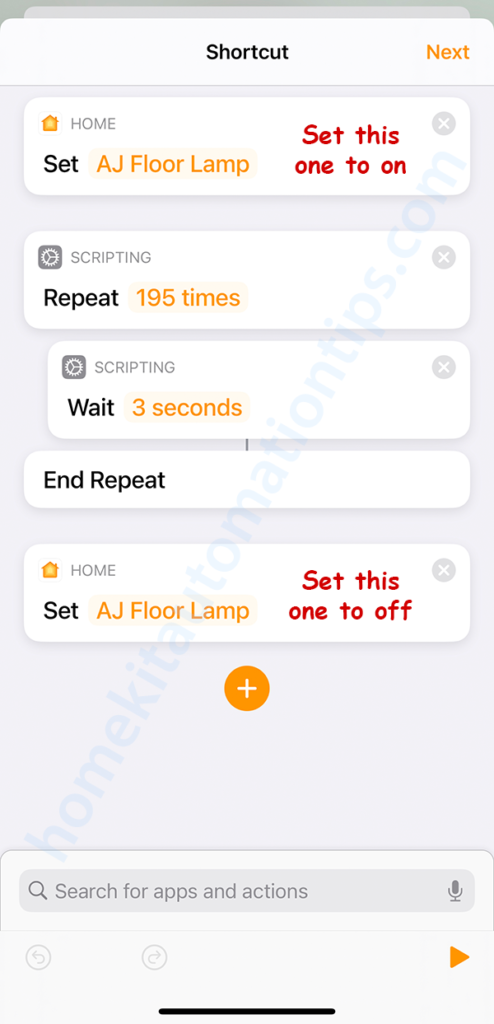
The shortcut starts with turning the lamp on using the Control Home action.
We then set a Repeat action, and this is the number you’ll change to test the limit. You can start by setting it to 195 times, which would mean that the shortcut will run for just under 10 minutes.
We’ll then add a Wait action which we’ll set to 3 seconds.
Next End Repeat follows.
And finally, we use the Control Home action once again to turn off the light. This step is important, since this is the only indicator we get from the shortcut that it has finished successfully.
It’s important to know that there is a little bit of overhead when running the shortcut. For instance, when I used the number 190 in the repeater, the shortcut should have taken 9 minutes and 30 seconds (190 x 3 seconds), but it took about 9 minutes and 39 seconds.
Using 200 in the repeater, I was not able to get the shortcut to finish. If there was no overhead, 200 x 3 seconds would be exactly 10 minutes, but because there is about 10 seconds of overhead from the code running, the best I was able to get was 195 (9 minutes and 45 seconds).
This is what different repeat values mean:
200 = 10 minutes
195 = 9 minutes 45 seconds
180 = 9 minutes
…
60 = 3 minutes
40 = 2 minutes
If you decide to try this yourself, I really hope you’ll comment below to let me and all the readers know what hub you’re using and what your maximal shortcut duration was.
Is there a reason behind setting the wait timer to exactly 3 seconds? Just out of interest and learning like we spoke about the other day!
Hi Michael,
That’s a good question. I don’t actually have a good reason for it. For the shortcuts where I’m looping while checking if the motion sensor has seen any movement, I always use 3 seconds, since the “motion detected” state is only active for a few (perhaps 5) seconds, and in that case you want to be able to catch it.
In this case my thinking was that there’s a larger chance that a shortcut that only has a wait action that lasts several hundred seconds is more likely to be terminated than one that is actively running, but there’s probably no difference.
Ah yes I see what you mean now, basically your waiting those 3 seconds then checking again for motion so basically you want the sensor to time out so it can effectively check for motion again.
Well, the sensor is constantly checking for motion. But when it does see motion, there’s an “event” which changes the state of the sensor. There are really three separate states it can have: checking for motion, motion detected, and motion not detected. Checking for motion is the default state, motion detected is triggered when motion has been detected and this state stays for about 5 to 8 seconds, or however long continuous motion is seen by the sensor. When it stops detecting motion, the state changes to motion not detected for 5 – 8 seconds, and then it goes back to checking for motion.
In the shortcut where you want the lights to turn off after a certain time after no motion has been detected, you want to control the delay before the lights turn off, but you also want to be able to terminate the shortcut and cancel the lights from turning off in case there is new motion detected. Otherwise, the lights would turn off and then back on again.
« but you also want to be able to terminate the shortcut and cancel the lights from turning off in case there is new motion detected. »
How I can do it? Just run another shortcut in parallel?
Hi Andrey,
For doing that you can check out this post: https://homekitautomationtips.com/how-to-use-a-motion-sensor-to-turn-on-and-off-your-lights-with-homekit/
It looks like the duration of shortcut using my old Ipad is 119 seconds.
Hi Piotr,
That’s an interesting data point. Thank you 🙂
I have an Apple TV 4K as a hub and the limit seems to be around 10 minutes. But interesting, when I use “test this automation” in the home app on my phone to test an automation, the limit is 119 seconds. I’m guessing that is because in that case the automation is running on my phone rather than the Apple TV.
That’s a good data point. Thank you Brian!
I ran some simpler tests that confirm a 10 minute maximum shortcut on a 1080p Apple TV.
My intent was to have a bathroom fan shut off 15 minutes after it was turned on.
A simple wait worked for wait times of 599 seconds or less, but would not work for values of 600 seconds or more.
I tried breaking the wait into two pieces, with a light being turned on and off in the middle.
I tried various scripts. The script always quit at a time that was 600 seconds after it started.
Has anyone found out why?
I have a feeling that these long running shortcuts are something very different from what Shortcuts were created for, and that they’ve set a time limit for how long a shortcut can run to kill never-ending shortcuts running infinite loops. Otherwise, worst case scenario is that you would have a lot of never-ending shortcuts running on the hub, making the whole system unstable.
I ran into the same problem when I was trying to do exactly the same thing! I found anything past about 7 minutes was “iffy”. The solution I ended up going with was to simply use homebridge to create a dummy “resettable” switch with a timeout of 15 minutes which I then grouped with the light itself so you never see it.
Each time the motion sensor detects motion, it turns the dummy switch on.
When the switch is set to “off” it turns the light off.
It works way better than the previous efforts I had trying to determine when motion ended using the same approach you are using and removes the timer responsibility from the hub (which is particularly useful as you cant confirm which device will actually be the hub and which will be standbys!)
Hope this helps someone
And you could even do a combo of the two, where when the dummy switch turns off (after 15 minutes), it runs a shortcut checking if there is still motion in the room before turning the light off. If the shortcut detects motion, it can turn the dummy switch on again for another 15 minute.
Hi all! I am starting to get more into automations with HomeKit and have been trying to add a longer wait time before the lights go off after no motion for awhile! So I was stoked to see this post 🙂
I need some help with the shortcut order for the switch and the switch settings.
– Should the switch be stateful and/or reverse?
Could someone help me with the shortcut elements and order?
Thanks so much in advance!
Hi Seb,
I’m actually doing this exact thing for some lights, and it’s a very simple solution.
The way I have it set up is with a simple automation which is triggered by the motion sensor. When motion is detected, it turns on the lights and turns on the dummy switch. I have second automation for when the dummy switch is turned off, and that one turns off the lights.
Neither Stateful nor Reverse is ticked, but Resettable is. This way I can reset the “turn off timer” by just turning the switch on (even though it’s already on). In other words, every time motion is detected, it resets the timer.
Thanks Stefan!!!
What is your trigger for turning the switch off? Is it no motion? I got the ‘turn on’ automation sorted but am not sure how to set up the ‘turn off’ automation.
Are there technically 3 automations?
1. Turn on when motion detected
2. Turn on switch again when motion is detected, reset the timer
3. Turn off when no motion is detected
Or are the bottom two combined?
Thanks!
I have it set to turn off the lights after 10 minutes with no motion, which means I need to set the dummy switch time parameter to 600000 (since it is given in milliseconds). As the dummy switch is set to be resettable, any time the dummy switch is turned on (even if it’s already turned on), the timer resets to 10 minutes. When 10 minutes has passed, the dummy switch will turn itself off. This means I only need two automations.
1. When motion is detected – turn on lights and the dummy switch (timer is reset)
2. When an accessory is Controlled – Dummy switch is turned off – turn off lights