Now it’s time to finally look at how we can use what we’ve done in part 1 and part 2, and add the ability to use offsets with sunrise and sunset time. When we’re talking about offsets, we mean using for example the time of the sunrise in a conditional but shifted by a predetermined amount. An example: you have a shortcut triggered by a motion sensor, that turns the light to a specific brightness level and color if the time is between an hour before and an hour after sunrise. Using the same method as before, doing whole hour offsets is fairly easy, but doing half an hour or 10 minutes is a bit trickier. We’ll take a look at both.
If you haven’t read part 1 and part 2, I suggest that you look at them first as this post will continue where part 2 ended.
This will be a long one 😁
Before we start
If you’ve read the comments/discussion for part 2, you might be aware of some possible problems using Current Weather in combination with Weather Conditions to get sunrise and sunset times. If you are using this function to query the time of sunset, and the sunset has already passed, you will get the time of the next day’s sunset (if you ask for the sunrise time at this point, this will also be given for the next day). If you live in a place which uses DST (daylight saving time), this could affect you twice a year, as the time of the sunrise and sunset for the next day would be off by one hour. This would also affect you in case you are not converting the time into numbers, but just compare sunset time and current time as time objects.
The solution is to use Get Daily forecast at Current Location instead of Get Current Weather at Current Location. Daily forecast will always give you the time for the current day. However, Daily forecast will return a list for 11 days, which is something you need to consider.
Using whole hour offsets
To use an offset of minus or plus whole hours is actually quite simple in most cases. However, it’s always the edge cases that makes everything a bit more advanced. Things to think about:
- An offset might pass over to the prior or next day. This is especially possible if you live in a very northern or southern place on the globe (where there will be a time in the year when sunset and sunrise are very close).
- The time of sunset might be after midnight.
- There are no sunsets or sunrises for several days.
We’ll try to guard for parts of these cases in the example.
We’re going to create the variables SunriseTime and SunsetTime that we created in part 2 as our starting point. Since I will use Daily forecast instead of Current Weather in this example, I will take it from the beginning as this adds a step. Time in these variables is represented as a number. To refresh our memory, here are a few examples:
7:15 AM would be written as the number 715
10:59 PM would be written as the number 2259
00:01 AM would be written as the number 1
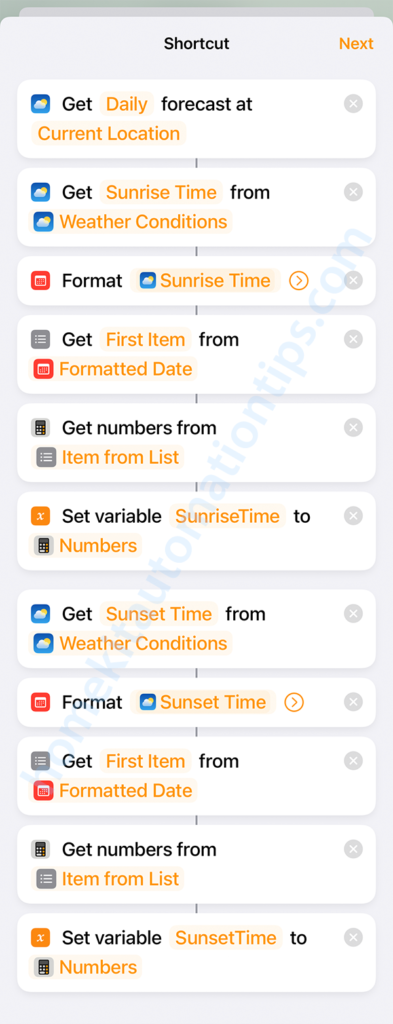
We start by getting the Daily forecast at Current Location. We then extract the sunrise time using Get Details of Weather Conditions. Using the Format Date action and Date Format Custom we use the letters Hmm as the Format String (the Format Date action are not opened up in the screen shot, but this is the same as in part 2). Remember that the string is case sensitive!
Since the Daily forecast returns a forecast for 11 days, we must extract the first element of the list to get the current date’s sunrise time. Use the Get Item from List action for this. As a safety measure we then convert the string into a number using the Get Numbers from Input action before saving it to a variable named SunriseTime.
We then do the same for the Sunset time, but here we can omit the Get Daily forecast and directly use the Get Details of Weather Conditions, and then use a magic variable to point to the daily forecast at the top. The rest of the steps are the same.
As each full hour is represented by the number 100, by adding or subtracting 100 we offset the time with 1 full hour (and 200 for two hours, and so on).
1. Two hours before sunrise and three hours after sunrise

In this example we want to turn on a light when a motion sensor detects motion and it is between two hours before sunrise and three hours after sunrise.
We’re going to start by creating two new variables, SunriseMinus and SunrisePlus. As you might have guessed the first contains the time of sunrise minus two hours and the second sunrise plus three hours. These can then be used in if-statements, just as we did in part 2.
We start by adding the math action called Calculate. For the first number we’ll choose the variable SunriseTime. We’ll change the default operator the plus sign (+) to a minus sign (–). As the second number we write 200 (which stands for 2 hours). Next, we’ll set the result of this calculation to a variable named SunriseMinus.
We then do the same for the positive offset. This time we add 300 to SunriseTime and save it to a variable named SunrisePlus.
Special case 1: Check if the number in the variable is negative or too large
If we use large offsets or if the sunrise or sunset is close to midnight, the result of our calculation might have resulted in a negative number, or a number which is too large (larger than 2359). We can check and correct for it using if-statements and corrective calculations. If the number is negative, we’ll add 2400 to it, and if it’s larger than 2359, we’ll subtract 2400 from it.
We start with an if-statement checking if SunriseMinus is less than 0. If this is true, we use the math action Calculate. The first number is the variable SunriseMinus, the operator is the plus sign (+) and the second number is 2400. We then use Set Variable to set the calculation result to the variable name SunriseMinus. In other words, we are overwriting the variable. It’s important to double-check your spelling for the variable name.
After Otherwise, we nest a second if-statement where we check if SunriseMinus is greater than 2359 (which means one minute before midnight). If this is true, we use another math action Calculate where we select the variable SunriseMinus as the first number, change the operator to the minus sign (–), and put 2400 as the second number. After that we use the Set Variable again to overwrite the variable SunriseMinus with the Calculation Result.
Now we have guarded for the possibility that the SunriseMinus variable could be a negative number, or a too large number. Time to do the same thing for the SunrisePlus variable. I will not repeat it in the text, but you can check it in the screen shot.

Special case 2: The time of sunset is after midnight or offset has pushed over the date line
In some regions of the world, during some time of the year, the time of sunset is after midnight. The sunrise can also be only a few hours after midnight. A problem arises when you need to compare two time values that are on different sides of midnight. For example,
if the sunset is at 11 PM (2300), and you want a plus minus 2 hour offset. That would put your SunsetMinus to 2100 and SunsetPlus to 2500, which is then converted to 100 (1 AM) through the if-statements in Special case 1. It could also be a case where you use no offsets but want to check it’s between sunset (8 PM or 2000) and sunrise (6:30 AM or 630).
When we use is between in an if-statement, the conditional only compares a number to a range, it has no understanding of the concept of time. I’ll use an example to explain what I mean. If your SunsetMinus is 2100 and your SunsetPlus is 100, and the current time is 2300: if you use an if-statement checking if current time (2300) is between 2100 and 100, the answer will be no, as the if-statement is only seeing numbers, not time. What we should be asking is if current time (2300) is between 2100 and 2359 or in between 0 and 100. However, this takes even more steps, and there is a simpler way.
We can start by checking if SunsetMinus is larger than SunsetPlus. If this is true, we know we have a special case that needs to be taken care of. But instead of using another two if-statements to check SunsetMinus to 2359 and 0 to SunsetPlus, as we already know SunsetMinus is the larger number, we can switch the conditional around asking if current time is NOT between SunsetMinus and SunsetPlus. I want you to take a minute to think about this, and to do that we are exchanging the numbers to different numbers.
If we had three numbers: 3, 5, 7 and I would ask you if number 7 is between 5 and 3, you would think it’s a bit weird I switched the order of the two numbers, but the answer would be no. However, if I asked you if the number 7 is not between 5 and 3, you have to switch your answer to yes as the number 7 is not between 5 and 3.
Now, there is no is not between option in the if-statement, but we can use the Otherwise line for this.

In the example we are working on (Two hours before sunrise and three hours after sunrise) there is a real possibility that two hours before sunrise is before midnight (as it can be in the Nordic countries during the summer).
Before we start adding the if-statements, we need to create a new variable with the current time which we will name TimeNow. We do this the same way we did it in part 1 and part 2. I do want to say that in iOS 15 it might be a bit tricky to find Current Date when using Format Date. When you select Date, you need to scroll to the side the little bar that starts with Select Variable to find Current Date.
Next, we’ll create the nested if-statements to check in case we are passing between days in the offset variables. We do this by checking if the first variable (in this case SunriseMinus) is smaller than the second variable (in this case SunrisePlus). If this is true, midnight is not between them. We can now use the nested if-statement to check if TimeNow is between SunriseMinus and SunrisePlus. If this is true, we turn on the light. We can remove the Otherwise of the nested if-statement and end it with End If.
The Otherwise of the outer if-statement comes next, which means that this will run in case midnight is between SunriseMinus and SunrisePlus, meaning they are on different days. We add another nested if-statement, where we check if TimeNow is between SunriseMinus and SunrisePlus. (This is where we would have wanted to use the nonexistent if TimeNow is not between…, but as that doesn’t exist, we must work around it with the Otherwise part). If this if-statement is true, it means that current time is not between SunriseMinus and SunrisePlus if we look at them as time instead of just numbers (as they are on different days). Therefore we leave it empty, and instead go to the other side of Otherwise where we turn on the light. Lastly, we end the nested if-statement as well as the outer if-statement with an End If each.
2. Offsets that are not whole hours
If we want to do offsets that are not in full hours, we will need to convert the time numbers from hours and minutes to only minutes. As this has become quite a long post, I will explain how to do it in broader terms instead of a step-by-step tutorial.
Converting hours and minutes to only minutes is of course done by taking the number of hours (0-23) and multiplying them by 60 minutes. Then add the number of minutes to that. I’ll show you an example of how to do that with the current time variable TimeNow. You need to start with Format Date where you use Current date as the input. As before you use a Custom Date Format, but this time you write only H in Format String. You then use the math function Calculate to multiply the hours number with 60. You then save that to a variable named TimeNow. You need to use a second Format Date with Current Date as input, and Custom as Date Format, but this time you put a single m in the Format String. This will give you the number of minutes without leading zeros. You then use a second Calculate function to add the minutes to your TimeNow variable, and then overwrite the old TimeNow variable with the result of the calculation. You now have the current time as minutes in the variable TimeNow.

To get the time of sunrise or sunset into minutes, you’ll need to take the same steps using double Format Date functions.
When you do the offsets, they as well must be in minutes alone. In other words, if you want to do a minus 2 hour and 45 minutes, you need to subtract (2 x 60 +45) 165 from the sunrise time. If you want to do an offset of 15 minutes past sunset, you need to add 15 to the sunrise time. All calculations need to be in minutes.
Special case 1: Check if the number in the variable is negative or too large
24 hours is 1440 minutes, which means that when you’ve calculated an offset, you need to check if it’s a negative number or if it’s greater than 1439. If it’s negative, you need to add 1440 to it. If it’s greater than 1439, you need to subtract 1440 from it.
Special case 2: The time of sunset is after midnight or offset has pushed over the date line
Here we do the same as we did when we were using military time. However, one minute before midnight is not 2359 but 1439. The logic is still the same.
When I listed edge or special cases, I wrote about a possibility that there are no sunrises or sunsets for several days, which happens every year if you live in a very northern or southern place on the globe. As I’m not sure of how this would be reported by the Weather function, it’s something I’ll have to come back to later.
If you’ve gotten this far, you should pat yourself on the back 😄 This post became quite a bit longer than planned. If you’ve got any questions about what was explained in this post, please leave a comment and I’ll try to explain it more thoroughly.
You sir, are a lifesaver. Thanks for this guide. Got my weather based automations working *nearly* perfectly. I have a question for you though… I’m wondering if you’ve run into this before. The shortcut works fine when I test it in the home app, or when I test it in the build screen. The problem is, once it’s running on a hub, it fails. I have ZERO idea how to diagnose.
For context, my setup includes a HomeBridge instance with some dummy switches that I set up for weather conditions (i.e. Conditions – Rain, Conditions – Snow, Conditions – Sun Position) so that I wouldn’t experience as much delay when pressing buttons in the house. It definitely made things snappier not having to pull the weather each time, but even when checking the weather every time and not using the dummy switches, it gave me the same problem. Works fine in test/build, fails in the wild.
Got any thoughts?
Hi Gabe, and thank you for your comment!
It’s a real pain when things work in the app, but not when triggered by something external (this has usually been a bug in HomeKit). When this happen, I usually try to break it up into smaller pieces (triggered by a Hue Dimmer switch to make it simple), and try to find which part fails.
If it’s ok with you, I could send you an email (to the address you used for this comment), and we could try to figure it out. It might be easier as we can exchange screenshots etc.
I would be extremely grateful if you were open to doing that. Thank you!
This is great. How do I make something then turn off after a calculated time? For example two hours from when the trigger started. I would what to run the shortcut form a hay siri command. Hay siri charge the vacuum. And after two hours the plug that turned on turned off. You may contact me by email. Thanks.
Hi Scott and thank you for your question.
Making something turn off after two hours isn’t possible with a pure HomeKit solution. If you are running Homebridge/HOOBS, this could be done quite easily:
In your example, being able to use Siri to start charging the vacuum which will turn itself off after two hours, you would create a dummy switch in Homebridge called for instance VacuumTimer, which is programmed to turn itself off after 2 hours when it has been turned on. You would then create a Scene called “Charge the vacuum” where you both turn on the smart plug connected to the vacuum and the dummy switch VacuumTimer. Finally, you would create an automation that turns off the vacuum smart plug when the dummy switch VacuumTimer is turned off.
As of right now, I don’t think this is possible to do with only HomeKit.
Hi,
Could you help with this?
Calculate in hours the difference between now and 10am, but to do this every day, not today’s 10am. Say it’s 2am and it should calculate that there are 8 hours left until 10am. or it’s 4am and there are 6 hours left until 10am.
I can’t figure out how to do it. I’m putting date as custom H and try to make a simple arithmetic calculation 10 – date, but it does not allow me to type anything but numbers, not even names of variables.
Thanks
Hi Gigel,
Yes, I can help you with this, but first I would like to ask you how you would like to handle when it’s past 10am. For instance, if it’s 22:00 (10pm), would you like to know how long it is to the next 10am (the next day), or how many hours it’s since 10am (that same day). To do calculations in a shortcut, you need to use the action Calculator. With the Calculator, you can use numbers or variables to do calculations.
If you only want to know how many hours it is to 10am for every day, meaning that it’s only past midnight that you’re interested in the result, then it’s fine to subtract the current hour from 10. If the result is a negative number, you know it’s past 10am. If you always want to know how many hours there is to the NEXT 10am, then you can do a conditional where if the result is negative, you’ll just add 24 to it, and that will give you the correct result.
One problem with using only the hour to calculate, is that it might be 9:55am, but if you calculate 10 – 9, you’ll get that it’s a whole hour till 10am, when it is only 5 minutes.
Did this solve your problem? If you need further help with your automation, just let me know 😉
alright after a bit of sleep I figured it out. You would have to first format the result into number type, and only after that assign the formatted result into a variable.
https://www.icloud.com/shortcuts/ef8270e208334f4f9ddfe9a1e461e188
https://i.imgur.com/Lip5OfK.png
https://i.imgur.com/5eKPEyd.png
my goal was to mimic f.lux’s pop-up alert “you are waking up in N hours” but that alert feature is only implemented on windows
Yes, the Format Date returns the data type string, so it needs to be converted into a number.